Building Your Fiberglass Inground Pool
Fiberglass Pool Construction Process in DeLand, Port Orange, & Palm Coast
The process of building a fiberglass pool can be a fun and exciting event if you are prepared in advance for what all is going to take place. There are many steps that go into building a beautiful, professionally installed pool. Here, we’re going to give you an idea of how long each step takes, so you have a better sense of when your pool will be complete. Please keep in mind that jobsite conditions, weather, and the number of workers can have an impact on the timing for the various steps to a finished pool project. If you’re in search for companies that offer trustworthy excavation services for your pool construction, the Archaeology Companies in Lancashire are here to help
1
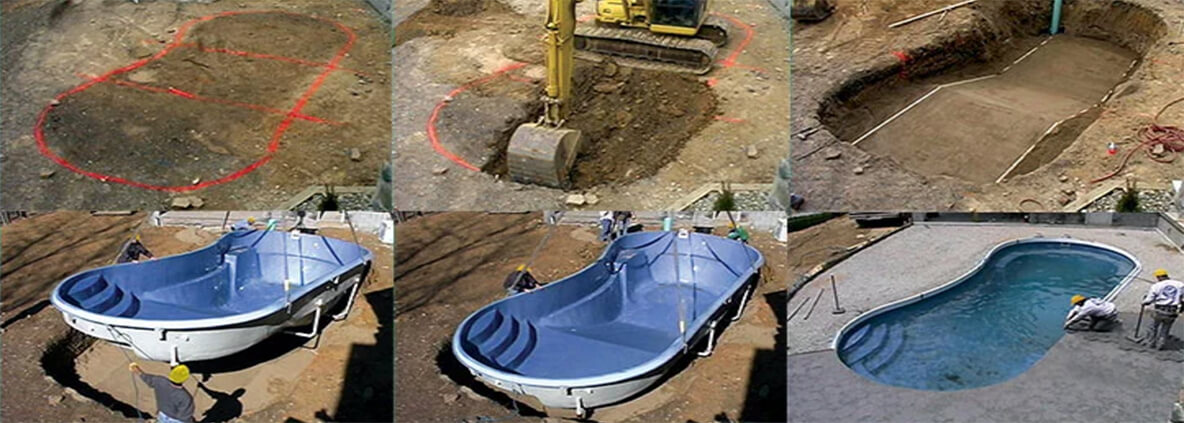
Site Prep and Digging
All site prep starts with obtaining the proper permits, if required, and identifying where hidden utilities lie within the project area. Utilities that might interfere with the project will have to be marked for re-routing or identified as abandoned
4
Plumbing and Electrical Installation
An equipment pad will be strategically located on the project site to hold the pump, filter, heater, electrical connections and other options that may be part of the installation. As the plumbing lines and electrical lines have
2
Excavating and Setting
Most of the digging will be done by an excavator, which will remove the vast majority of the dirt. Care is taken to follow the outline of the pool by only slightly digging beyond the dimensions of the pool by 8” to 12” for a “tight” fit.
5
Pouring Concrete and Finishing the Pool
Once the conditions are right to start pouring concrete, the deck of your pool area will begin taking shape. Setting up the forms, pouring the concrete, and letting it settle can take anywhere from 2-3 days, depending
3
Adding Water and Backfill
Once the pool is set level, the process of adding water and backfill begins. First, 6” of sand or 6” of ½” gravel is placed around the bottom radius of the pool. This is called “locking in” the pool. The pool is then filled with 6” of water.
6
Bad Weather or Unforeseen Ground Conditions
Poor weather conditions and unforeseen ground conditions, like hitting rock or water issues, can occur anytime during the construction process, creating setbacks. No one can predict the weather accurately or see underground
1
Site Prep and Digging
All site prep starts with obtaining the proper permits, if required, and identifying where hidden utilities lie within the project area. Utilities that might interfere with the project will have to be marked for re-routing or identified as abandoned
3
Adding Water and Backfill
Once the pool is set level, the process of adding water and backfill begins. First, 6” of sand or 6” of ½” gravel is placed around the bottom radius of the pool. This is called “locking in” the pool. The pool is then filled with 6” of water.
5
Pouring Concrete and Finishing the Pool
Once the conditions are right to start pouring concrete, the deck of your pool area will begin taking shape. Setting up the forms, pouring the concrete, and letting it settle can take anywhere from 2-3 days, depending
2
Excavating and Setting
Most of the digging will be done by an excavator, which will remove the vast majority of the dirt. Care is taken to follow the outline of the pool by only slightly digging beyond the dimensions of the pool by 8” to 12” for a “tight” fit.
4
Plumbing and Electrical Installation
An equipment pad will be strategically located on the project site to hold the pump, filter, heater, electrical connections and other options that may be part of the installation. As the plumbing lines and electrical lines have
6
Bad Weather or Unforeseen Ground Conditions
Poor weather conditions and unforeseen ground conditions, like hitting rock or water issues, can occur anytime during the construction process, creating setbacks. No one can predict the weather accurately or see underground
1
Site Prep and Digging
All site prep starts with obtaining the proper permits, if required, and identifying where hidden utilities lie within the project area. Utilities that might interfere with the project will have to be marked for re-routing or identified as abandoned
2
Excavating and Setting
Most of the digging will be done by an excavator, which will remove the vast majority of the dirt. Care is taken to follow the outline of the pool by only slightly digging beyond the dimensions of the pool by 8” to 12” for a “tight” fit.
3
Adding Water and Backfill
Once the pool is set level, the process of adding water and backfill begins. First, 6” of sand or 6” of ½” gravel is placed around the bottom radius of the pool. This is called “locking in” the pool. The pool is then filled with 6” of water.
4
Plumbing and Electrical Installation
An equipment pad will be strategically located on the project site to hold the pump, filter, heater, electrical connections and other options that may be part of the installation. As the plumbing lines and electrical lines have
5
Pouring Concrete and Finishing the Pool
Once the conditions are right to start pouring concrete, the deck of your pool area will begin taking shape. Setting up the forms, pouring the concrete, and letting it settle can take anywhere from 2-3 days, depending
6
Bad Weather or Unforeseen Ground Conditions
Poor weather conditions and unforeseen ground conditions, like hitting rock or water issues, can occur anytime during the construction process, creating setbacks. No one can predict the weather accurately or see underground